
 Jenkins: InfluxDB Plugin을 사용하여 Job 모니터링하기
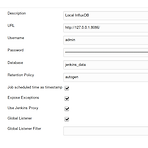
InfluxDB Plugin https://wiki.jenkins.io/display/JENKINS/InfluxDB+Plugin 설정법 글로벌 설정 위 플러그인을 설치 후 젠킨스 설정으로 가면 아래와 같은 설정 화면을 볼 수 있다. Job scheduled time as timestamp: 잡이 실행하는 시점의 시간으로 기록 Expose Exceptions: InfluxDB 적재 오류시 Exception 발생 Global Listener: 전체 잡에 글로벌하게 적용 (관리하는 잡이 많을 경우 이 기능이 매우 유용) 잡 별개로 설정 Job 마다 별개로 설정이 가능하다. 자세한 설정은 위키를 참조하자. https://wiki.jenkins.io/display/JENKINS/InfluxDB+Plugin
https://engineering.taboola.com/5-simple-tips-boosting-jenkins-performance/ 5 Simple tips for boosting your Jenkins performance - Taboola Tech Blog Do you know that feeling when you’ve finished working on a feature, pushed the code, but then your Read More... engineering.taboola.com Tip 1: Minimize the amount of builds on the master node Tip 2: Do not keep too much build history Tip 3: Clear old..
 How to replace Jenkins logo and title text
Refer below link http://seleniumocean.blogspot.com/2018/03/replace-jenkins-logo-and-text-to-your.html Install a plugin https://wiki.jenkins.io/display/JENKINS/Simple+Theme+Plugin https://plugins.jenkins.io/simple-theme-plugin Configure Jenkins --> Manage Jenkins --> Configure System --> Theme CS sample /* Custom style for Autobahn Jenkins Platform */ .logo img { content:url("/userContent/layout/..
개요 Server에서 Server 로 데이터를 옮길 경우 매우 귀찮고 힘들다. 로컬이나 게이트웨이 서버에 내렸다가 올리는 그런 귀찮은 방법들.. Python 의 SimpleHTTPServer 를 이용하면 매우 쉽게 옮길 수 있다. 방법 서버 IP 를 확인한다. $ ifconfig 아래와 같은 명령으로 웹서버를 띄운다. $ python -m SimpleHTTPServer 8000 브라우저에서 잘 보여지는지 확인해 본다. http://:8000 파일을 받을 서버에서 wget 을 이용하여 다운로드 한다. $ wget http://:8000/files/test.log
Github Your repository -> Settings Integrations & services tab Click 'Add service' -> Jenkin (Github plugin) Jenkins hook url: http://github-webhook/ Hooks tab Click 'Add webhook' Payload URL: https:///ghprbhook/ Content type: application/x-www-form-urlencoded Check 'Jeus the push event'
Chrome Browser Download url: https://dl.google.com/linux/direct/google-chrome-stable_current_x86_64.rpm $ wget https://dl.google.com/linux/direct/google-chrome-stable_current_x86_64.rpm $ sudo yum localinstall google-chrome-stable_current_x86_64.rpm # command $ google-chromeChrome Driver Download url: http://chromedriver.chromium.org/downloads https://chromedriver.storage.googleapis.com/75.0.377..
증상 Jenkins 실행하면 Permission denied 가 발생한다. Terminal 로 접속하여 직접 ansible command를 실행하면 정상 접근이 된다. Terminal 에서 수동 실행 후 Jenkins 에서 실행하면 또 된다. 확인 내용 구글링을 했더니 ssh 관련 로그 위치를 알 수 있었다. 위치는 /var/log/secure 접근 안될 때 내용을 보니 아래와 같다. Apr 26 12:14:45 XXXXX sshd[74792]: Authentication refused: bad ownership or modes for file /home/xxxxx/.ssh/authorized_keys Apr 26 12:14:45 XXXXX sshd[74795]: Connection closed by 1..
 Mac: 맥(MacOS) 에서 스크린캡쳐 파일명 영문으로 변경하기
"스크린샷" 을 다른 문구로 변경 터미널 (Terminal)을 엽니다. iTerm2 사용하시면 iTerm2을 사용하셔도 되구요. defaults write com.apple.screencapture name "" ex) defaults write com.apple.screencapture name "screen_capture" && killall SystemUIServer 여기서 "&&" 는 앞에꺼 실행 후에 곧바로 뒤에꺼 연속으로 실행하는 옵션입니다. 예) defaults write com.apple.screencapture name "screen_capture" && killall SystemUIServer 이렇게 할 경우 아래와 같은 형태로 생성이 됩니다. 그러나 "오전/오후"가 아직도 한글이죠. ..
 Nexus 2: How to create user tokens (넥서스2 유저 토큰 생성 방법)
Document: https://help.sonatype.com/repomanager2/configuration/security-setup-with-user-tokens Security Setup with User Tokens Resetting user tokens forces the users to update the settings.xml with the newly created tokens and potentially breaks any command line builds using the tokens until this change is carried out. This specifically also applies to continuous integration serve help.sonatype...
 Jenkins: Couldn't find any revision to build. Verify the repository and branch configuration for this job
Jenkins 에서 빌드 시 아래와 같은 오류 발생하면서 빌드가 실패하곤 하는데요. Couldn't find any revision to build. Verify the repository and branch configuration for this job 그럴 경우, Jenkins 에서 해당 잡 설정으로 가서 Git 설정을 수정합니다. Refspec 란에 `+refs/pull/*:refs/remotes/origin/pr/*` 을 설정합니다.
If you install yum with yum, you may get the following error. yum 으로 특정 패키지 설치 시 아래와 같이 에러가 발생하는 경우가 있다. $ sudo yum install telegraf rpmdb: Thread/process 62517/140235890440096 failed: Thread died in Berkeley DB library error: db3 error(-30974) from dbenv->failchk: DB_RUNRECOVERY: Fatal error, run database recovery error: cannot open Packages index using db3 - (-30974) error: cannot open Package..
@Autowired private Environment env; public void method() { String url = env.getProperty("memcached.url"); } @Value("${memcached.url}") String memcachedUrl; public void method() { String url = memcachedUrl; }

import socket import sys import os try: hosts = os.environ['hosts'] print('=============================================') for host in hosts.replace('\n',' ').replace(',', ' ').split(): ip = socket.gethostbyname(host) print('{}\t{}'.format(host, ip)) print('=============================================') except IndexError as idxErr: print('Usage : python3 get_ip.py ')
Search full (전체 조회)$ sysctl -a Find specific values only (특정 파라미터만 조회)# use option 'grep' $ sysctl -a | grep keepalive_time Change the value (값 수정)# use option '-w' (-w 옵션 사용) ex) sysctl -w net.ipv4.tcp_keepalive_time="240"
total - free - buffers - cached
# 힙메모리 설정-Xms8g -Xmx8g # GC 설정-XX:+UseG1GC -verbose:gc -Xloggc:/kakao/logs/gc/gc.log -XX:+PrintGCDetails -XX:+PrintGCDateStamps -XX:+PrintGCTimeStamps # 힙덤프 설정-XX:+HeapDumpOnOutOfMemoryError -XX:HeapDumpPath=/kakao/logs/heapdump/ # JMX 관련-Dcom.sun.management.jmxremote=true -Dcom.sun.management.jmxremote.port=9090 -Dcom.sun.management.jmxremote.ssl=false -Dcom.sun.management.jmxremote.authenticat..

Swap 메모리 초기화 스왑 모드를 껐다(OFF)가 다시 켜면(ON) 된다.$ swapoff -a && swapon -a # root 계정이 아닐 경우$ sudo swapoff -a && sudo swapon -a * 기존 swap을 많이 사용중이었다면 위 명령어를 실행 후 다소 시간이 소요된다.* swapoff 를 하면 swap 에 있던 것을 physical memory 에 옮겨지기 때문에 physical memory 사용량이 좀 더 증가할 수 있다.
Environment variablesenvironment 에다가 설정하면 된다.사용할 때는 $변수명 형태로 사용하면 된다.예제pipeline { environment { PROJECT = "my_project" PHASE = "alpha" } agent { label "BUILD"} stages { stage("START") { steps { sh 'echo "project: $PROJECT, phase: $PHASE"' } } }}
 Jenkins (젠킨스) - Declarative Pipeline 공유 라이브러리 구성하기
참고자료- Declarative Pipeline: Notifications and Shared Libraries : https://jenkins.io/blog/2017/02/15/declarative-notifications/- Extending with Shared Libraries: https://jenkins.io/doc/book/pipeline/shared-libraries/ 저장소를 만들자공유 라이브러리를 저장할 저장소를 생성한다.디렉토리 구성은 아래와 같이 한다. vars 밑에 넣어두면 된다. (root) +- src # Groovy source files | +- org | +- foo | +- Bar.groovy # for org.foo.Bar class +- vars | +- foo.gr..
common.yml 이라는 playbook 파일이 있다는 과정에서 다른 playbook 에서 common.yml 을 Include 하는 방법은 아주 간단한다. ---- include: common.yml vars: param1: "param1_value" param2: "param2_value" 위와 같이 작성하면 되고 파라미터 전달 시 vars 구문을 이용하면 된다.공통적인건 common에 하드코딩하고 각 playbook 마다 다르게 적용하고 싶으면 vars 로 전달 후 common.yml 에서 {{param1}}, {{param2}} 형태로 사용하면 된다.
- Total
- Today
- Yesterday
- Password manager
- 엔시블
- ssl
- 쓰레드덤프
- 젠킨스
- groovy
- Jenkins
- Nexus
- 리눅스
- Linux
- Shell Script
- 플레이북
- Playbook
- 파이프라인
- openssl
- JVM
- vagrant
- Config History
- nginx
- rsync
- DevOps
- Docker
- 엔서블
- iTerm2
- rundeck
- Ansible
- 데브옵스
- PostgreSQL
- Thread Dump
- URL Encoding
| 일 | 월 | 화 | 수 | 목 | 금 | 토 |
|---|---|---|---|---|---|---|
| 1 | 2 | 3 | 4 | 5 | ||
| 6 | 7 | 8 | 9 | 10 | 11 | 12 |
| 13 | 14 | 15 | 16 | 17 | 18 | 19 |
| 20 | 21 | 22 | 23 | 24 | 25 | 26 |
| 27 | 28 | 29 | 30 |